Showing posts with label ribbon. Show all posts

Sunday, December 17, 2017

Last 2017 Christmas Card

While working on my previous cactus Christmas card I also stamped a couple using my cactus and die sets so I decided to make a 2nd cactus Christmas card.

 
I used scraps from the last card to create this card. This time I remembered to emboss the red panel.
 
The, "decorations" are some old jewels I wanted to use up. I also added a bit of ribbon, twine and a brad all from my stash.


Friday, December 8, 2017

North Pole Blog Hop - Connie Can Crop

 
Welcome to
...
The North Pole
Blog Hop
To the North Pole I'd like to go,
Over fields of ice and snow;
To see Santa dear,
Mrs. Claus and the elves would be
Waiting there for you and me;
Where they make the toys so busily!
  Connie Can Crop  is the beginning of this hop! If you need to start at the beginning head over to Rebecca
This is a one day blog hop, but you have until Sunday to finish hopping and leaving your love for all of these talented elves.
We have an awesome sponsor for this month!


One lucky winner will win a gift certificate
Be sure to check out the shop online HERE
What do you need to do to win? Easy... become a follower of each of the fabulous blogs in this hop and leave each of them a comment letting them know what you like best about their projects.
You will have until 10 pm Sunday to finish the hop and leave your comments.
Winners will be announced on Wednesday 12/13/17 at Connie Can Crop.
Be sure to follow everyone and leave a comment along the way!
In his wonderful reindeer sleigh,
Santa would whisk us all away;
Flying merrily,
Non stop to the NORTH POLE!!
 
 
I used Craftin' Desert Diva's Christmas Eve digi stamp. These are both pre-colored. I printed them onto 110 lb. paper then did a fussy cut, added some Glazed Dimensions to Santa's Fur and the stockings hanging on the mantle and the fire. Some ribbon, twine and a couple of jewels and the cards were finished, great for last minute cards.

Next head on over to Santa's workshop to visit with Miranda
Here's our line up in case you get lost along the way.
 
Don't forget to join our current challenge
Connie Can Crop Challenge #65
I'm So Fancy (OUR LAST Challenge)
due 11:59 P.M. Saturday, December 30th, 2017
Pacific Time

Thursday, August 31, 2017

DT Day With Paper Nest Dolls

Today is my day to share my project made with this month's sponsor image from Paper Nest Doll  at Connie Can Crop. I choose this cute mermaid to work with because I love mermaids and lighthouses.


I have had this little cutting board for a few months trying to decide what to do with it. It measures 5 1/2" tall (without the handle) x 4 1/2" wide. I got it at a little place called The Kitchen Collection, it was only a couple of dollars.
 
After I colored the image with colored pencils I fussy cut it then I coated the cutting board with a coat of Mod Podge. When the first coat dried I put a coat on the back of the cutout mermaid and adhered it to the board. After it dried I put another layer of Mod Podge over all of it.
 
I added some jewels and a ribbon.
 
Please come and join in the fun with this month's Watercolors challenge at Connie Can Crop.


Thursday, May 25, 2017

DT Day with Connie's Crafty Cart

Today is my day to post over at Connie Can Crop.

 
The papers and, "Thank You" I used all came from:


The card folds at the top.

Card base measures: 5" wide x 5.5" tall.
The yellow layer was embossed with my Cuttlebug. The circle and scalloped circle are Spellbinder's dies. The ribbon and pearls are from my stash.

Please come and join in the fun with this month's challenge:


Thursday, October 1, 2015

Inkspiration Septembery Mystery-Challenge

I stumbled across this challenge a couple of days ago and I thought it looked like fun so I decided to play along.


Recipe:
 
Card Base - Pumpkin cardstock from my stash
Stamp - Pumpkin with sunflowers from Plum Purdy - colored with Pumpkin, Light Pumpkin, Yellow, Green on Pale Beige Watercolor paints on Watercolor Paper
Sentiment - Computer generated
Die cut - Spider Web and Spider - Cricut's October 31 and Happy Hauntings
White Ribbon with Pumpkins
Button with Twine from my stash
After I painted the flower centers a pale shade of Pumpkin I added a coat of Champagne Craft Twinkles from DecoArt
 
I want to enter this challenge:

Inkspiration.blogspot.septembery-mystery-challenge

Friday, May 29, 2015

Chicken Note Cards

I have a thing for chickens and I would love to have a couple of laying hens, a couple fancy hens and a rooster. Link to file.

 
You get 3 each of 3 different sizes for a total of 9 labels and you can print as many as you need. I used the 3 small ones, put one on a bit lopsided so I put a middle sized label over the small one.
 
 
A while back, you know how it goes you see something interesting you think might work well for some projects then you just can't find the right project so that pack of Kraft paper with designs on it sat for 2 years. Shhhh......don't tell on me.

 
I can't believe how easy these cards were to make, out of each 8.5" x 11" sheet of paper I got 2 cards. I cut the sheets in half on the long side making the cards 5.5" tall x 4.25" wide when folded. After cutting the labels out I backed them with a piece of black cardstock.

 
I added a piece of ribbon and a couple of Queen and Co. flowers on two of them, and a button from Melissa Frances on the other one. I also added some Queen and Co. pearls. I've had those for a while too, ever since the 2012 Great Lakes Mega Meet.


Friday, April 3, 2015

Gift box with matching card

I love chickens so when I saw this printable I just had to have it, one of these days I would like to have a few chickens of my own. Link to printable
 
 
You get 7 images on the sheet, 3 of the larger image and 4 of the smaller one. I used two of the bigger images on the box and 1 of the smaller images on the card.
 
 
I made this cute gift box and matching card. The box is cut using my Cricut and Tags, Bags, Boxes and More 2 cartridge. The papers were printed with my Imagine. I used my Cuttlebug Alphabet Dies to cut the, "Hello Spring".
 
 
After cutting the box out I added the checkerboard paper then wrapped a black and white stripped ribbon then topped that ribbon with red ribbon. I added red and black twine at the top and tied it into a bow. I adhered the images using foam pads.


I used the same papers on the card but added a piece of read to break up the checkerboard paper. Wrapped the same ribbons around the checkerboard and lower part of the red layer, I used foam tape to adhere the layers to the card face with some extra foam tape under the shaker portion. I used clear beads and red sequins to the shaker element. And added a piece of red twine to the folded edge.


Friday, March 27, 2015

Easter Cards

Easter is right around the corner and Deena has several Easter Printables to choose from. I really like this collage sheet featuring vintage Easter images.    
 
You get 5 total images, two 4" squares and three 3" egg shapes.
 

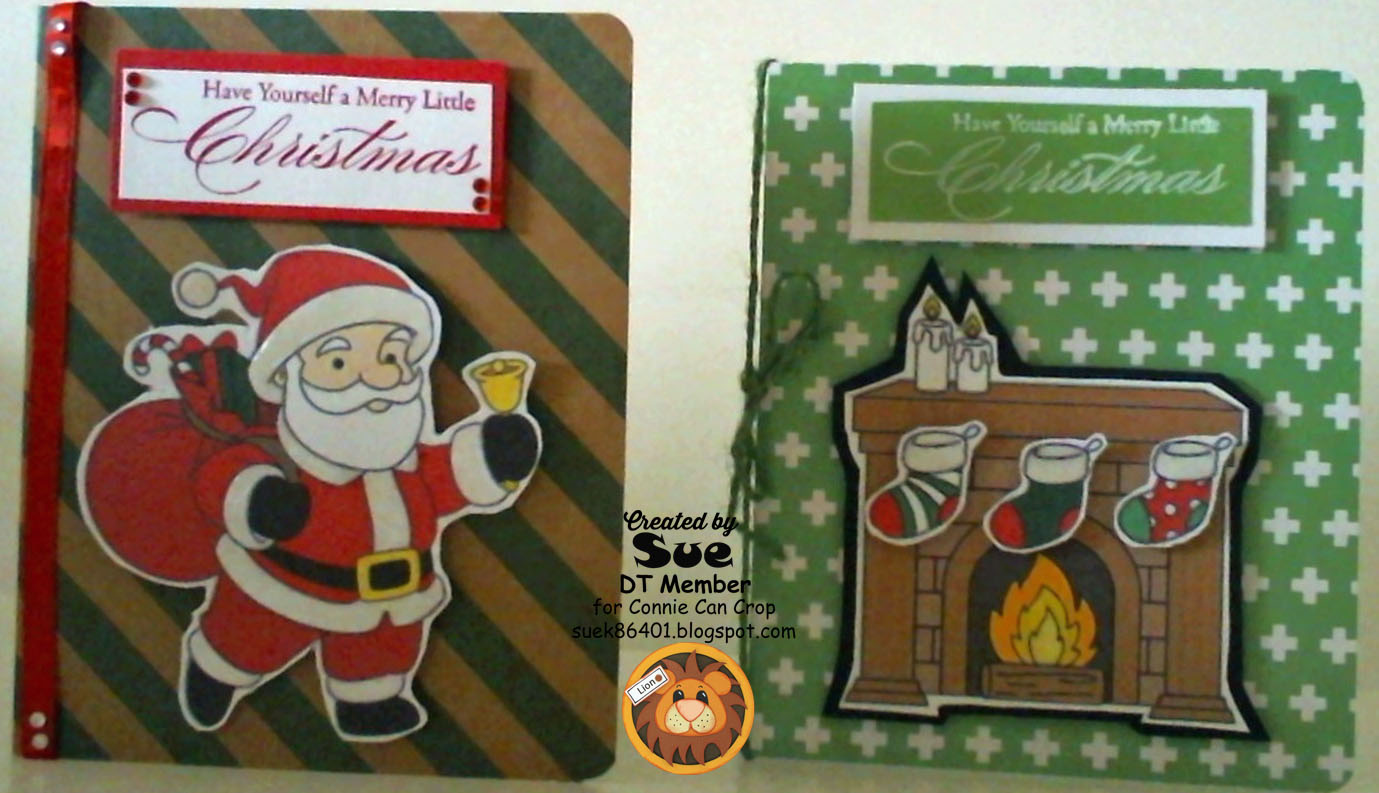
I made two different card designs:


For my first card I used Kraft paper for the card base and added a pink background with an Easter ribbon, a few Imaginisce jewels and I was finished with card 1.
 
 
For the second card I added a border stamp from Close to My Heart, sentiment stamp from my stash and a few sequins along with the background paper and ribbon.


The third card is an accordion fold, I used the 3 egg shaped images after starting with a cream card base that I added a touch of color to with my eBrush. I used some scraps to make the layer under the images and I embossed them with my eBosser and Swirltangle folder.
 
The butterflies are some brads from my stash that I cut the backs off of and glued them to the card. I also used a couple of decorative buttons and a bow made with a Couture die set which I won from Create and Craft TV, a few sequins and sentiment which is printed on vellum. I inked all of the edges.
 
Deena's Printable files are so easy to use, just print cut and design, they make the, "work" go very fast so you still have plenty of time to get a few cards made and mailed.


Saturday, February 14, 2015

HIMCR #187 - Super Scraps Saturday

HIMCR #187 - Super Scraps Saturday! And Blog Hop!!!


Just use Scraps and image from Little Miss Muffet Stamps!
The sponsor is Little Miss Muffet Stamps!

 
The giveaway is $6 Gift Certificate to Little Miss Muffet Stamps!


This week I tried a new technique, using acrylic paint with my embossing folder that I found here: YouTube  I watched this video a couple of times then sat down to give it a try myself. She suggests using watercolor paper, I don't have any so I went with plain cardstock. I found that I was adding either too much water to the paint or putting it on the folder too thick, it took a few tries to get it right. The less busy the folder is, the better your results.

 
Recipe:
 
Image from Little Miss Muffet Stamps
Cardstock
Colored pencils
Acrylic paints
Ribbon (my ribbon came from my Create and Craft TV blog hop prize, the ribbons were wrapped around my prizes)
Embossing folders (Cuttlebug Argyle, Darice Flower Frenzy and eBosser Delicate Dots)
Action Wobble
Chipboard
 
I used up 4 scraps this week, I need to use a up a whole lot more, they are taking over my craft room.
 
I colored my image with my colored pencils then sat down with my paints and Darice Flower Frenzy embossing folder. I painted the folder and inserted my white cardstock, pressing the paint onto the paper.
 
I used my Cuttlebug Argyle folder on the pink paper and the eBosser Delicate Dots folder on the blue card base.
 
I backed my image with a piece of chipboard (old Ritz cracker box) and added an Action Wobble to it.
 
No sentiment yet because I haven't decided what to use it for.
 
Here are all of the stops along the hop:
 
Kathy Up In the night with Kat. http://www.upinthenightwithkat.blogspot.com/
Sue’s Paper Crafts http://suek86401.blogspot.com/ - YOU ARE HERE
Designs By Sammy http://designsbysamm...y.blogspot.com/
LJ Creations http://www.ljcreation.blogspot.com/
Jenscrapstoo http://jenscrapstoo.blogspot.com/
Laura   http://laurascreativeworld.blogspot.ca/


Saturday, December 6, 2014

HIMCR # 177 - Paper Temptress Christmas Colors


HIMCR #177 - Christmas Colors!

This can be whatever colors you like to use at Christmas time!


The sponsor is Papertemptress.com


The giveaway is a pack of Christmas papers from Papertemptress.com!

We got to play with Paper Temptress papers this week, the papers are all beautiful. I had so much fun that I made two projects.


For my first one I used the package of papers sent to me by Paper Temptress. The paper has a beautiful shimmer to it, you can see it on the tree. It also embosses beautifully. The ribbon is two sided (at least it appears to be to me), it is thick heavy duty and very easy to work with.

I freehand cut the card, it is 5 1/2" tall x 4 1/4" wide when folded. The tree is a Cuttlebug die, the star and ornaments are from the same die and embossed with the matching Cuttlebug folder. The white background is embossed using my snowflake Cuttlebug folder. Tree and sentiment are adhered with foam pads.

Papers used:
Card base and red ornaments - Red Pepper Thick Classic Columns (you can see and feel the columns)
White background - Cryogen White
Tree - Emerald Mica/Metallic
Green ornaments and green layer under sentiment - Jelly Bean Green Pop Tones 100#
Cream ornaments - Candido Incandescent
Sentiment stamped onto - Opal Mica/Metallic I used Peeled Paint Ranger Distress Ink to stamp the sentiment.
Star - Gold Metallic
Ribbon - also from Paper Temptress - Green/Red Ladder Ribbon

This paper is wonderful for stamping and embossing.


For my second card I used some papers that a friend had sent me. I cut and embossed the ornament with the same Cuttlebug folder and die set. I wrapped ribbon around the middle of the card using the reverse side from the card above then made a little bow using the reverse side of the ribbon.

The base is a 5 1/2" wide x 4 1/4" when folded cut from a piece of White Wide Columns. You can see and feel the columns.
Sentiment panel:
Bottom - Silver Mica/Metallic
Middle - Neehah Solar Wite 80#
Top - Lapis Lazuli Mica/Metallic (text)
Ornaments:
Red - Jupiter Red Mica/Metallic
Gold - Gold Metallic
Green - Green Felt, it has a texture of it's own that I can't get to photograph well.
Silver - Silver Mica/Metallic

The sentiment is embossed with VersaMark Ink and Snowflake Embossing Tinsel by Ranger.

Saturday, November 22, 2014

HIMCR #175 - Any Holiday

 HIMCR #175 - Any Holiday!

This can be ANY Holiday! Take this time to get caught on past Holidays or if you're like me it's past time to bang out some much needed Christmas cards!!

The sponsor is Serri Baldy's My Besties!

 
The giveaway is all 4 Digital images used by our HICMR Design Team!!


 This little girl is so cute that I couldn't resist her.

I used both colored pencils and Souffle pens to color her. The card base and oval were printed and cut with my Cricut Imagine using one of the papers from Christmas Wish, the card is from Just Because Cards.

I ran the oval through my eBosser using my Delicate Dots folder. It didn't print quite right so I added some chunky glitter to the area that wasn't right. I used foam pads to adhere both the oval and image to the card. I added a piece of blue ribbon near the folded edge and blue jewels to the opening edge.


Saturday, November 15, 2014

HIMCR # 174 - Think Fall

For My Craft Spot Guest Designer project please click here: Guest Spot
 
 HIMCR #174 - Think Fall!
 
Anything that is Fall themed!
The sponsor is 2 Cute Ink!

Here's the link: http://www.2cuteink.com/
The giveaway is 2 digital images from 2 Cute Ink!

This little fox is just darling, he looks like he's having a great time playing in the leaves.
 

Recipe:
Image from 2 Cute Ink
Colored Pencils
Cardstock
Burlap
Zva Creative Bling - CRS-05CB-110
Clear acetate
Unity Stamps - Feel Better Soon
StazOn Ink pad
eBosser and Craftwell Quatrafoil embossing folder
Xyron 3" sticker maker
Action Wobble
 
Card base measures 8 1/2" wide x 5 1/2" tall when folded. Emboss with Quatrafoil embossing folder, score in middle and fold.
Print and color image then layer onto a piece of cardstock then onto a piece of burlap.
Add ribbon to card base.
Stamp sentiment and fussy cut then put through Xyron sticker maker.
Add bling, attach Action Wobble to back of layered image then attach to card, add sentiment.


Entering into this challenges: