Showing posts with label Christmas card. Show all posts

Friday, February 19, 2016

It's Christmas in February

For some unknown reason I decided to work with a Christmas file this week, maybe because I really like this file.
 
 
You get 3 large and 2 small images of each saying for a total of 10 images on the page and you can print up as many as you need. These make really cute Christmas cards, I think that using them for a Christmas banner would also be really cute. I decided to make up a few Christmas cards so that I'll be ahead of the game this year.
 
I used 8 1/2" x 11 Kraft paper, getting 2 cards out of each sheet of paper.
 
You can't see it very well in the pictures but I added some gold Craft Twinkles to the stars before adhering them to the cards. The Craft Twinkles show up a lot better in person and add a bit of sparkle to the cards.


On the inside I used the smaller images...using the other sentiment on the inside...The "Merry Christmas" on the outside, "Merry and Bright" on the inside.
 
I also chomped my corners and added some pearls to the outside.


Friday, December 18, 2015

Sugar & Spice & Everything Nice

I have been having so much fun using Deena's printables to create my Christmas cards, this time I also made a couple of bookmarks to go with the cards.
 
 
They look good enough to eat.
 
 
I backed the bookmarks with the same color blue cardstock I used for the card bases then I inked the edges. On two of them I punched a hole with my Crop-A-Dile and added a string, I used the other 2 on the cards.
 
You can't see it in the pictures but I used a snow embossing folder on the darker blue cardstock and inked the edges then I layered everything and created the cards. Very fast and easy quick project, cute for Teachers or any readers on your list.
 

Friday, November 27, 2015

PDE Linky Party

Here is my very first project as a Design Team Member for the PDE Linky Party Blog .

Projects can be anything - 3D, Tags, Cards, Scrapbooking, Wall Décor, Framed Art, Mini Albums, crochet, decorations, invitations, banners, paintings,.... anything at all that you created. 

For my first project I decided to make my Christmas Cards.

 
The cards measure 4 1/4" wide x 5 1/2" tall, I got 2 cards out of each 8 1/2" x 11" sheet of cardstock.
 
I used a snow embossing folder on the card faces, embossing 2 at a time with my eBosser.
 
The green layer is 4 1/4" wide x 1 1/2" tall, I used my Delicate Dots 8 1/2" x 11" folder and eBosser.
 
The white strip is 2" wide x 4 1/2" tall. The tree stamp is from My Mind's Eye 12 Days of Christmas set, the Happy Holidays is a Hero Arts stamp.
 
The star on top of the tree and colored circles are from some confetti that I have had in my stash for a very long time.
 
Please come and join in the fun.  PDE Linky Party.


Saturday, August 22, 2015

HIMCR #213 - Any Holiday! August 22nd

HIMCR #213 - Any Holiday! 

Sponsored by Sweet 'n Sassy Stamps


I used my image on the inside, it was the perfect size for my 2nd favorite toy that I picked up while at HOOT 2 weeks ago. Stampendous was in the house so I just had to go over and see what I could see and I fell in love with this die set.

 
I saw this die and wanted it but I didn't want to buy the, "go with" items, the stamp and die set they sell so I went back to Renee's Plum Purdy booth and thought on it for a while. Then I went back and asked if I had to buy the, "go with" items and was told that I could use any flowers with it so I snatched it up.
 
This tutorial was a huge help to me: Stampendous Tutorial  and I set to work with the sponsor image as the centerpiece of my Pop-Up.


The papers are from Craft Smith's Christmasville paper pad. All of the snowflake stamps are from my stash as well as all of the sentiments.
 
You get:
(1) pop-up card die
(4) 4 nesting oval frame dies
(4) nesting rectangular frame dies
(3) edger dies
 
I used all but 1 of the edger dies on this card.
 
After printing the, "You Light Up My Life Snowman" stamp from Sweet 'n Sassy Stamps on white cardstock, I also printed it onto a piece of light blue paper. I colored the image with watercolor pencils that I picked up while we were at HOOT. The snowflakes are from my stash, they were white, I added the color to them with a blue Spectrum Noir marker and my eBrush.
 
Using the pop-up card die I then used one of the edger dies to give it a fancy edge. I also cut the same cut onto a piece of blue cardstock. Stamped the snowflakes with a dark blue ink and used the oval frame dies on the inside sentiments, and 2 of the rectangular frame dies on the outside sentiment, added some sequins and Stickles. I attached the outer sentiment with foam pads.


Saturday, July 4, 2015

HIMCR #206 - Red White & Blue With a Twist


HIMCR #206 - Red, White, & Blue with a Twist! (July 4th)
 
Make it Christmas in July!

 
The sponsor is Scrapper's Delights!

The giveaway is 3 images from Scrapper's Delights!


Red and white paper is from Craft Smith. I colored my image using red and blue colored pencils, added the sentiment and stamped some snowflakes. I used blue and white beads and blue sequins in my shaker element.
 
I also added some navy rick rack and white snowflakes.


Friday, December 19, 2014

12 Months of Christmas

I have been chosen to be a part of The 12 Months of Christmas design team. This is my first card for the new team.

 
This beautiful paper is from:


Please go visit them, they have a wide variety of beautiful papers and digis to choose from. Lisa is very talented and it shows in her designs.
 
I downsized the design so that it would fit on the face of my card which measures 5 1/2" tall x 4 1/4" wide. Then I stamped the sentiment in red and the holly bells in black and colored the bells and leaves in using some colored pencils, I added red pearls for the holly.
 
The stamps are from the, "Have a Holly Jolly Christmas" set from:Plum Purdy Designs by Renee Mullins another very talented lady.


Thanks for stopping by.


Monday, December 15, 2014

Path of Positivity - Challenge #21 Midway Post

I'm a Guest Designer this month at Path of Positivity this month's theme is Faith. I'm very honored to have been asked to take part in this challenge.

 For the midway post I decided to use this design from: Pickled-Potpourri  this was a very easy image to work with and the sentiment is already on the card.


I used my Spectrum Noir markers to color the design then I layered it onto a piece of silver glitter paper that I embossed using my eBosser and Delicate Dots folder. The card base is DCWV, I added a piece of gold and white twine to the side and some jewels to the opening edge and a red bow under the candlestick.


The reason I chose this image is because the sentiment says it all, Christmas is the most Blessed time of the year and a true miracle happened when our Lord, Jesus Christ was born.
The celebration of the birth of our Lord Jesus Christ is the Holiest day of the year.  Whatever your own personal beliefs, it is important to have faith in your life.  The idea of believing in something that you can't tangibly see or hear, like love for example, helps to give us hope; and, we could all do with a little more hope.

The sponsors and prizes for this challenge are:
  • A prize package of a $7 gift certificate to the Pickled Potpourri Designs store (good for any digital product), from our guest sponsors this month, for the post or project that the DT deems most inspiring of the bunch.
  • Three digital images from Fresh Brewed Designs for a person chosen in a random draw based on all entrants.
  • One digital image from Creative Bug Digital Stamps for each person chosen as a DT Delight.
There will also be:
  • One digital designer paper (made to order in a few different ways) from Décosse's Dynamite Doodles for one lucky voter who leaves a comment.
  • One digital sentiment for every single person who enters the challenge.


Saturday, December 13, 2014

HIMCR #178 - Super Scraps Saturday - Shaker Card


HIMCR #178 - Super Scraps Saturday!

Time to get out those scraps!


The sponsor is The Paper Shelter!


The giveaway is a $20 gift certificate to The Paper Shelter!


Recipe:
Image from The Paper Shelter, I used the colored image.
All of my scraps are from DCVW Christmas stacks
Ribbon
Clear acetate
Chipboard, mine was from the back of a pad of paper.
Sequins
 
Print image, mine is 4" x 4", I cut the frame to fit with my Cricut and Fancy Frames Cartridge. I also cut 4 of the frame from chipboard for the shaker element (rather than using layers of foam tape), I glued one chipboard frame on top of the other, glued the clear acetate window then the red glitter frame.
Assemble the card and layers then place the image on the card face and adhere it using a good adhesive. Place some sequins on top of the image and adhere the layered frame on top of the printed image.
I stamped the, "Happy Holiday's" using a stamp from my stash onto white cardstock then I layered it with a piece of the red glitter paper.


Saturday, December 6, 2014

HIMCR # 177 - Paper Temptress Christmas Colors


HIMCR #177 - Christmas Colors!

This can be whatever colors you like to use at Christmas time!


The sponsor is Papertemptress.com


The giveaway is a pack of Christmas papers from Papertemptress.com!

We got to play with Paper Temptress papers this week, the papers are all beautiful. I had so much fun that I made two projects.


For my first one I used the package of papers sent to me by Paper Temptress. The paper has a beautiful shimmer to it, you can see it on the tree. It also embosses beautifully. The ribbon is two sided (at least it appears to be to me), it is thick heavy duty and very easy to work with.

I freehand cut the card, it is 5 1/2" tall x 4 1/4" wide when folded. The tree is a Cuttlebug die, the star and ornaments are from the same die and embossed with the matching Cuttlebug folder. The white background is embossed using my snowflake Cuttlebug folder. Tree and sentiment are adhered with foam pads.

Papers used:
Card base and red ornaments - Red Pepper Thick Classic Columns (you can see and feel the columns)
White background - Cryogen White
Tree - Emerald Mica/Metallic
Green ornaments and green layer under sentiment - Jelly Bean Green Pop Tones 100#
Cream ornaments - Candido Incandescent
Sentiment stamped onto - Opal Mica/Metallic I used Peeled Paint Ranger Distress Ink to stamp the sentiment.
Star - Gold Metallic
Ribbon - also from Paper Temptress - Green/Red Ladder Ribbon

This paper is wonderful for stamping and embossing.


For my second card I used some papers that a friend had sent me. I cut and embossed the ornament with the same Cuttlebug folder and die set. I wrapped ribbon around the middle of the card using the reverse side from the card above then made a little bow using the reverse side of the ribbon.

The base is a 5 1/2" wide x 4 1/4" when folded cut from a piece of White Wide Columns. You can see and feel the columns.
Sentiment panel:
Bottom - Silver Mica/Metallic
Middle - Neehah Solar Wite 80#
Top - Lapis Lazuli Mica/Metallic (text)
Ornaments:
Red - Jupiter Red Mica/Metallic
Gold - Gold Metallic
Green - Green Felt, it has a texture of it's own that I can't get to photograph well.
Silver - Silver Mica/Metallic

The sentiment is embossed with VersaMark Ink and Snowflake Embossing Tinsel by Ranger.

Wednesday, December 3, 2014

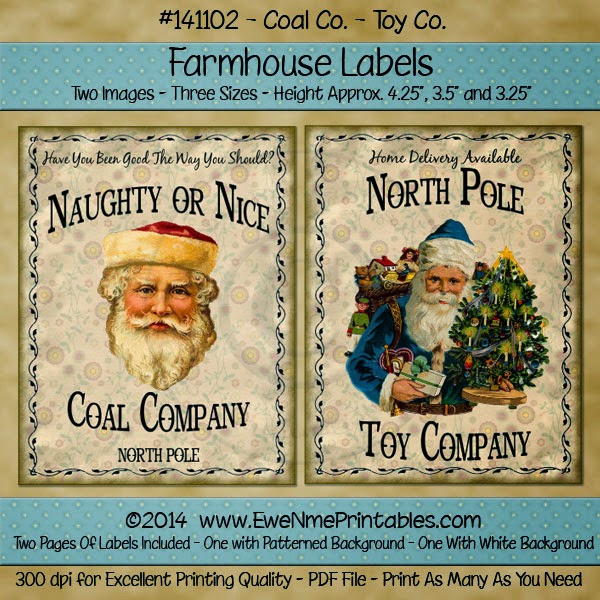
Printable Farmhouse Label Projects

For this project I used the:


Toy Co/Coal Co
 
You get 12 total labels, two different images in 3 different sizes.


My first card is a side step card. I found a very good video on how to cut and score this card: Side Step Card on Youtube I used one of the smallest images on this card. To make my, "coal" I used some black fleece scraps I have leftover from a pair of pajamas that I made myself. I didn't make the strips uniform, coal doesn't come that way in nature. I cut 4 strips of fleece approximately 1.75" wide x 3" tall, folded them in half to form almost a square then stitch together on the bottom and sides then turn so they are right side out and stuff with fiberfill, stitch opening closed. The Christmas stocking and sentiment were cut with my Cricut.
 
Next came some tags.
 
 
After cutting out my images (I used the next size up from the side step card) I mounted them onto some green scraps I had on hand, punched a hole in the upper left corner and added the ribbon.
 
I also made 4 cards.


I cut some Christmas papers from my stash and cut the cards, the first 3 cards measure 6" high x 4 1/4" wide when folded and trimmed the corners, then I cut a layer to mount the images onto. I tied a twine around the middle on two of them, and a bow on one. The last and smaller card measures 5 1/2" high x 5" wide when folded. I also added a layer to this card and a twine bow. For these 4 cards I used the 2 biggest sizes of the images.