Showing posts with label eBrush. Show all posts

Sunday, October 18, 2015

Happy Blogaversary Taunya

My bloggy friend Taunya is celebrating her 4th Blogaversary this month. As part of the celebration she posted this picture:
 
And asked her followers to make her a card using this picture as inspiration.
 
I used the daisy and colors:


Opps...that darned sequin center that fell off, I reattached it after taking the pictures.

 
I used the my pop up die set from Stampendous, I opted to not use the 3 pop-ups in the middle section so I covered them with several layers of the blue painter's tape.
 
All of the daises are from Cricut's Mickey and Friends cartridge, the vase is from Art Nouveau. I used white cardstock for the daises and colored them with my eBrush. The bling is from Zva Creative.


Saturday, October 3, 2015

HIMCR #219 - Monochromatic

HIMCR #219 - Monochromatic! You choose the color!!

The sponsor is Graciellie Design!
 

The giveaway is ????

 
I printed my image and fussy cut it out. I sprayed the light grey paper with a dark grey marker using my eBrush then I cut a scalloped circle to layer the doily onto. I used a Darcie embossing folder, the sentiment is from the same set the doily came from.
 

Saturday, August 29, 2015

HIMCR #214 - Freestyle!!!

HIMCR #214 -  Freestyle!!

 
The sponsor is Sami Stamps!
The giveaway is a $12 Gift Certificate to Sami Stamps!


I decided to make a mini album with this week's image, this image is prefect for summer memories. I used a couple of the items I picked up at the HOOT convention in Ohio, the white dots on the ice cream were made with DecoArt's Snow Writer which is a dimensional paint and you can't see it in the picture but on the cone I added some DecoArt Craft Twinkles.


All of the embellishments and printed papers are from docrafts Little Meow collection which I won via facebook and docrafts.


I sprayed the solid papers with my ebrush and a variety of markers. I used my Cinch to bind the pages.
 

Saturday, August 22, 2015

HIMCR #213 - Any Holiday! August 22nd

HIMCR #213 - Any Holiday! 

Sponsored by Sweet 'n Sassy Stamps


I used my image on the inside, it was the perfect size for my 2nd favorite toy that I picked up while at HOOT 2 weeks ago. Stampendous was in the house so I just had to go over and see what I could see and I fell in love with this die set.

 
I saw this die and wanted it but I didn't want to buy the, "go with" items, the stamp and die set they sell so I went back to Renee's Plum Purdy booth and thought on it for a while. Then I went back and asked if I had to buy the, "go with" items and was told that I could use any flowers with it so I snatched it up.
 
This tutorial was a huge help to me: Stampendous Tutorial  and I set to work with the sponsor image as the centerpiece of my Pop-Up.


The papers are from Craft Smith's Christmasville paper pad. All of the snowflake stamps are from my stash as well as all of the sentiments.
 
You get:
(1) pop-up card die
(4) 4 nesting oval frame dies
(4) nesting rectangular frame dies
(3) edger dies
 
I used all but 1 of the edger dies on this card.
 
After printing the, "You Light Up My Life Snowman" stamp from Sweet 'n Sassy Stamps on white cardstock, I also printed it onto a piece of light blue paper. I colored the image with watercolor pencils that I picked up while we were at HOOT. The snowflakes are from my stash, they were white, I added the color to them with a blue Spectrum Noir marker and my eBrush.
 
Using the pop-up card die I then used one of the edger dies to give it a fancy edge. I also cut the same cut onto a piece of blue cardstock. Stamped the snowflakes with a dark blue ink and used the oval frame dies on the inside sentiments, and 2 of the rectangular frame dies on the outside sentiment, added some sequins and Stickles. I attached the outer sentiment with foam pads.


Saturday, June 6, 2015

HIMCR #202 - Summer Colors

HIMCR #202 - Summer Colors! (June 6th)
 
The sponsor is Sami Stamps!


The giveaway is a $12 Gift Certificate to Sami Stamps!

 
In my mind nothing can beat the clear blue summer skies especially here in Arizona where the skies are totally clear, we can go for days without seeing a single cloud.
 
I thought this bubble fairy was really cute and blue fairies are the best. I printed her then colored her with colored pencils and added some Accent Essentials to the bubble, "highlight" areas and to her wings then I sprinkled some blue glitter on her wings. I also added some blue and white stickles to fill in some of the area between the bubbles. Here is a bit closer look at the shaker that I filled with blue and white beads plus a few blue and silver sequins.


 After making the shaker element I cut a piece of watercolor paper to fit my pre-made card base. I colored the paper with my eBrush then used a damp paint brush to spread the color around then I added some circles using a stamp from My Creative Time with blue ink.
After wrapping a ribbon around the folded edge I added a crystal flower and some silver sequins.
 

Friday, May 8, 2015

French Country Prints Planner/Journal

Have you noticed the Planner/Journal trend that has exploded in the paper crafting world? I thought that these Beautiful French Country Print Daisies would make a perfect Planner/Journal with a matching card.
 
 
There are 2 total images with this Printable, 1 with a white background and 1 with an antique look background.


I used the white one for the planner/journal and the antique one for the card.
 
 
I printed both of the French Country Prints on a piece of 4 x 6 cardstock.
 
For the Planner/Journal I cut a piece of goldish cardstock, added a piece of chipboard to the back of and covered with another piece of matching cardstock on the inside. I also added a piece of burlap which I frayed. I cut the butterfly with my Cuttlebug and also embossed the top layer which I cut out of a piece of Japanese craft paper that my kids in Tokyo sent me and added a few sequins.
 
I used my Cinch to bind the planner/journal. Here is a picture of the inside.


For the card I started with a 5 x 7 blank card base, I took 2 scraps of goldish cardstock, taping them together at the center with green and white stripped washi tape. 2 wooden butterflies which I colored with my eBrush and added a couple of jewels to the centers, a few sequins and a piece of green and white twine completed the card.
 
The edges of the prints have been inked.
 

Friday, March 20, 2015

Retro Valentine Cards

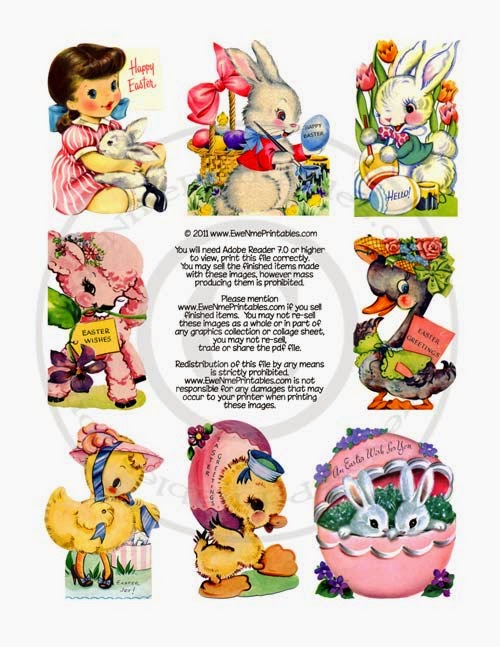
This week I had the pleasure to work with this darling Easter Cutout Printable.


You get 8 different images on the sheet. I decided that some accordion cards would be a great way to use them.
 
 
These are quick and easy to make and it didn't take very long to make them.
 
 
Both of the cards measure 4" tall x 12" across, I scored them every 3 inches giving me 4 folds to work with.
 
After printing out the file, I adhered the entire sheet to a piece of very thin chipboard then cut out each image and inked the edges.
 
The printed layers behind the images all measure 3 1/2" tall x 2 1/2" wide except for the first and last panels on the second card, those are 3 1/4" tall x 2 3/4" wide.
 
 
On the first card I added a sequin topped by a pearl on each corner and a Melissa Frances wooden butterfly sprayed with my eBrush. The second card has a jewel in each corner and a purple butterfly that I added a few pearls to.
 
I eBrushed some white cardstock with pink and purple Spectrum Noir markers for the second card.
 
You can tie them closed with just about anything, ribbon, twine, etc. I used some fluffy string that I have had for several years.
 
Thank you for stopping by to take a look.


Monday, March 9, 2015

Twinchies 2

I made 2 more Twinchies for the eBrush challenge.

 
This is on a piece of 2" x 2" chipboard, I sprayed several different colors on the background then I quilled the flower and attached it. The 2 small flowers started out yellow/gold like the one below.


I sprayed two of the jewel flowers with a Spectrum Noir marker and attached them to the Twinchie after they dried. I added some yellow stickles to the flower centers.
You can't tell but I did spray the quilled flower with a yellow TomBow marker but it doesn't show the way I wanted it to. The flower started out being a deep red but with the yellow marker added to it, it is more of a red/orange color.

 
This is also a 2" x 2" square of chipboard. I decided to do the background differently on this one, first I applied 2 coats of a creamy acrylic paint.
After the paint dried I sprayed the background with a blue Spectrum Noir marker then I added my stencils to spray the rose and, "Love" then I added a sequin to each corner.


Saturday, March 7, 2015

HIMCR #190 - Freestyle

HIMCR #190 - Freestyle!


The sponsor is Papertemptress.com


Recipe:
 
Paper Temptress papers
eBrush
Spectrum Noir Markers
Quilling tools
Washi tape
Foam Pads
 
I sprayed the background paper with my eBrush to add a touch of color. I used pinks and blues. I also embossed it using my eBosser and the Quatrafoil folder.
 
The green paper is embossed with the Delicate Dots folder, I used foam dots to adhere it to the card face.
 
I quilled the flower and butterfly, I used white paper for the flower and sprayed it with my eBrush.
 
The sentiment was also eBrushed.
 
The washi tape is from my kids in Tokyo
 

Friday, March 6, 2015

Happy St. Patty's Day

I received a card from a pen pal last week that I just had to give a try so I choose this file from Deena's printables to use with them. I would like to thank and credit Lana in Montana for this card design.
 
You get 12 total images in two different sizes, one of each image in 2 sizes. I used 4 of the large images to create these cards.


I made them all basically the same way, the only difference being the papers. I must confess that I did a little cheat on them, I cut all of the circles with my Cricut instead of my circle cutter.
 
The larger circle is 5 1/2" round, the smaller circle is 4 1/2".


After cutting the circles out, I added some shamrocks with my eBrush to the smaller circles. I did not score the circles, I simply folded them in half then went over the folds with my bone folder and glued the smaller circles onto the larger circles.


I cut backing pieces for the images from a very heavy cardstock and used a corner rounder on them. I adhered the images to the backing pieces and added some jewels to the tops and bottoms, then glued them to the fronts of the cards along with some shamrocks that I also cut with my Cricut. I used my Cricut ink pens first to give them an outline and to help define and separate all of the greens.


I used the same sentiment on all of them, which is computer generated. I backed the sentiments with the same heavy duty cardstock I used on the images, rounded the corners, added a couple of rhinestones and glued them to the backs of the cards adding more shamrocks.
 
 
These cards are really easy to create and assemble, I made all 4 of them in 1 sitting. The cards rock back and forth, it's hard to show that in a still picture.
 
The Bazzill Basics paper that I used on 2 of the cards are from a blog hop win and came from Create and Craft TV so I would like to thank them for the beautiful papers (and other goodies I received).
 
Thank you for stopping by to take a look at my creations.
 
Sue


Thursday, March 5, 2015

Twinchies - eBrush challenge

Making a 2" x 2" project is a bit of a challenge but I love challenges. Here is my first Twinchie, I made it for a challenge over on the eBrush Facebook Page.

 
Recipe:
 
2" x 2" piece of chipboard
Acrylic paint
eBrush
Spectrum Noir JG3 - green
Jewels
Shamrocks
Foam pads
 
I painted the background with acrylic paint then I went around the edges with my eBrush.
I cut the shamrocks with my Cricut, first using my Cricut Ink then cutting with the blade. Each shamrock is 1/4" smaller than the previous one. I also spritzed each shamrock with my Spectrum Noir JG3 green marker and stacked them using foam squares.


Wednesday, February 18, 2015

St. Patrick's Day Gift Bag and Card

St. Patrick's Day will be here soon and I have started making a few items to share with my friends. Today I worked with the Shamrock Seeds Feedsack Printable

 
You get 3 different sizes and it includes the reversed images to use for iron-ons. I haven't used an iron-on for many years and I had forgotten how easy they are to do.
 
I got out a lot of my crafty toys to make this including both my Serger and regular sewing machines.
 
 
I started with the gift bag, cutting out one of the reverse images and a piece of fabric from my sewing stash.
 
Using the instructions that come with your transfer sheets, print your image and iron it onto your fabric. Then I used my eBrush and one of my shamrock stencils to add some shamrocks to the gift bag. I Serged the seams and made a casing on the top for the ribbon to go through with my regular machine. Then I punched some holes into the casing and ran some green ribbon through it and added a couple pieces of the leprechaun's gold.


For my card I started by spraying my papers with 2 different shamrock masks and eBrush.
 
 
After spraying the papers I cut the card base to measure 5 1/4" wide x 5 1/2" tall, the solid green layer is 4 1/4" inches wide x 4 3/4" tall. The light olive green layer measures 3 1/2" wide x 4" tall and the Shamrock Seeds layer is 2 1/2" wide x 3 3/4" tall. I chomped all of the corners with my Crop-A-Dile Corner Chomper using the Scalloped side.
 
 
On the inside I stamped a shamrock and added a vellum envelope full of, "shamrock seeds".
 
 
Thank you for stopping by to take a look at my project, please come again.

Thursday, February 5, 2015

Angel Love Tags - Ewe-N-Me Printables Blog Hop

Welcome To The
Ewe-N-Me Printables Valentine Blog Hop


Deena made this cute file for me to work with:
 
Angel Love Tags: you get 6 tags total, 3 each of 2 different sizes. I used the larger size for my Valentine card.
 
 
I cut out the tag and inked the edges with black StazOn ink, I also cut a background layer for it and also inked that edge. I punched a hole in the top and added my twine.
 
For the background I made a mask and sprayed it with a peach Tombow marker and my eBrush.
 
I added a piece of washi tape to the bottom (my kids in Tokyo sent it to me). I cut the peach heart with my Cuttlebug and Sizzix Primitive Hearts #2. The bling is from Zva Creative. The tag is attached with foam squares.

This hop will run for three days Feb. 6th, 7th and 8th, 2015
(free files will be available on Feb. 9th)

Visit each Design Team Member's blog
and check out our exclusive Valentine designs:

If you follow each blog and leave a comment on each blog you'll get all the printables used in the hop for FREE!

HOP GUIDELINES
1. FOLLOW all four blogs in this hop. You can follow by using Google Friend Connect, Blog Lovin, email, etc. (Each blog has different options.)

2. COMMENT on all four stops and let each designer know what you think of their project.

3. SUBMIT your info on the last stop of the hop (
www.ewenmeprintables.blogspot.com) to let us know that you've followed the rules. Once the form* is received, we'll send you the links to the free printables used in the hop. The download links will be sent when the hop is over. (Feb. 9, 2015)

*Filling out the form is NOT a guarantee of files... please be patient while we verify your info.

 
I also have a giveaway going, two of my homemade masks/stencils, with Valentine's Day being right around the corner I am giving away 2 of my heart designs:
 
 
Hearts - 1
Each mask measures approximately 6 1/2" x 6 1/2", the hearts measure approximately 3/8".

Hearts - 2
The hearts on this mask measure approximately 5/8", 1/2" and 3/8". These are many other designs are on sale on my blog for $4.00 each.
 
Due to the cost of shipping, I can only ship to the US and Canada for this giveaway.
 
To win this giveaway you must be a follower of my blog and leave a comment below. 
 
Thank you for stopping by.
 
Sue