Showing posts with label twine. Show all posts

Friday, December 22, 2017

My Last DT Day Project

This is my last Design Team project for Connie Can Crop. Our sponsor is:
 
I used my file to make my great-nephew's Christmas card.
 
 
Before printing my digi to color I colored the background and added Austin's name with my photo program then I used chalks to color the image.
 
The card base is a scrap in my stash. I added some jewels and twine and attached the image panel with foam dots.
 
Don't forgot to take part in Connie's last challenge:


Friday, December 8, 2017

North Pole Blog Hop - Connie Can Crop

 
Welcome to
...
The North Pole
Blog Hop
To the North Pole I'd like to go,
Over fields of ice and snow;
To see Santa dear,
Mrs. Claus and the elves would be
Waiting there for you and me;
Where they make the toys so busily!
  Connie Can Crop  is the beginning of this hop! If you need to start at the beginning head over to Rebecca
This is a one day blog hop, but you have until Sunday to finish hopping and leaving your love for all of these talented elves.
We have an awesome sponsor for this month!


One lucky winner will win a gift certificate
Be sure to check out the shop online HERE
What do you need to do to win? Easy... become a follower of each of the fabulous blogs in this hop and leave each of them a comment letting them know what you like best about their projects.
You will have until 10 pm Sunday to finish the hop and leave your comments.
Winners will be announced on Wednesday 12/13/17 at Connie Can Crop.
Be sure to follow everyone and leave a comment along the way!
In his wonderful reindeer sleigh,
Santa would whisk us all away;
Flying merrily,
Non stop to the NORTH POLE!!
 
 
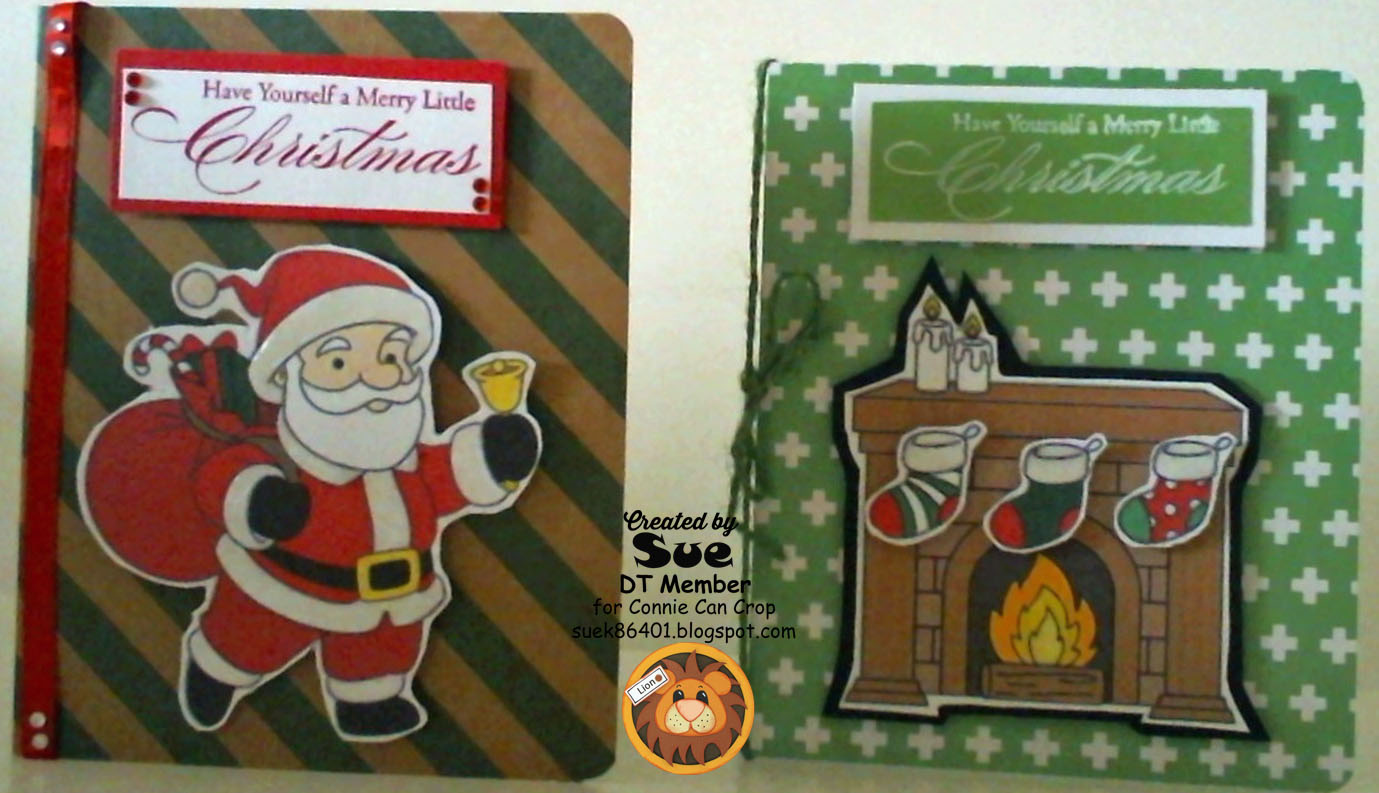
I used Craftin' Desert Diva's Christmas Eve digi stamp. These are both pre-colored. I printed them onto 110 lb. paper then did a fussy cut, added some Glazed Dimensions to Santa's Fur and the stockings hanging on the mantle and the fire. Some ribbon, twine and a couple of jewels and the cards were finished, great for last minute cards.

Next head on over to Santa's workshop to visit with Miranda
Here's our line up in case you get lost along the way.
 
Don't forget to join our current challenge
Connie Can Crop Challenge #65
I'm So Fancy (OUR LAST Challenge)
due 11:59 P.M. Saturday, December 30th, 2017
Pacific Time

Thursday, November 23, 2017

DT Day with Bugaboo Stamps

Today is my day to show off what I have made with my image from this month's sponsor: Bugaboo Stamps over at Connie Can Crop.


I choose this cute little squirrel to work with and I decided to stick to this month's color pallet.

I used chalks to color him then I added a bit of Glazed Dimensions to the hearts and little highlight areas of the acorns. I used Wild Honey Distress Oxide on the edges.
 
The card measures 5.5" wide x 4.25" tall. I added a piece of fall themed washi tape, a bit of twine and a few pearls to finish the card off.
 
Please come and join us for this month's color challenge at Connie Can Crop. Only one more challenge after this one.


Thursday, November 16, 2017

Route 66 Christmas Card

In October I signed up to become a Fun Stampers Journey Coach. Since I live a mile from Route 66 and live in a Route 66 tourist town I choose their, " Hit the Road" stamp set for one of my Coach Kit items.
 
Here is the card I made using the truck and one of the Route 66 signs from the stamp set.


The sentiment is from Fun Stampers Journey's, "Holly Jolly" stamp set (I also picked up the matching dies for that set) and the holly die cut is from their, "Medallion Wreath Die Set".

The black squiggly line underneath the truck is Route 66 and I marked our town, Kingman, AZ with a green jewel.

The 2 thin green strips are quilling paper (so much easier than trying to cut it myself).

I used wet embossing on the truck, sentiment and Route 66 sign. Fun Stampers Journey white ink works great!!

Thursday, June 1, 2017

Connie Can Crop - It's a Guy Thing Challenge

 
It's time for the, "It's a Guy Thing" challenge over at Connie Can Crop
 
We have a brand new sponsor this month: SasayakiGlitter they have some really CUTE digi stamps.


Since my, "little guy's" birthday is tomorrow I decided to make him a birthday card. I have to send it to Tokyo I have to keep it as thin and light weight as I can to help keep the postage down.


Some of you might recognize this photo from a project I recently made but this is the first picture of the 2 of us and it is my favorite pic of the 2 of us for a couple of reasons. Bottom line: we both made it home from the hospital alive, not a small feat if you know about the complications we both had.

ANYHOW!!!! Back to the project.

The card base measures 6" wide x 5" tall, the doily under the pic is a die from my stash. The sentiment was cut from Cricut's, "Cricut Font and Basic Shapes" cartridge. Before cutting it out I went over the cut using my Cricut ink.

After adding a piece of black and white twine and a few jewels the card was complete.

Come on over and join in this month's fun.


Connie Can Crop Challenge #59
due 11:59 P.M., Friday, June 30th, 2017
Pacific Time

Thursday, May 4, 2017

Connie Can Crop - Cyber Crop - Challenge #2

I was very busy yesterday and wasn't able to get to yesterday's Connie Can Crop - Cyber Hop - Challenge #2 which was,


For this challenge you need to make a project with a tree as the center of attention. Here is mine.

 
I cut this card with Cricut's, "Life is a Beach" cartridge using the palm tree square card. I cut the card at 5" and the tree toppers at 3.75 and they fit perfect.
 
Sentiment is from the same cartridge. Before cutting the letters I first used a Cricut pen instead of the blade and it outlined all of the letters then I put the blade back in and cut them out.

I am entering this card into this challenge:
Connie Can Crop - Cyber Hop - Challenge #2

The winner gets a prize from Connie's Crafty Cart.


Deadline to enter is May 7th, 2017 at 10
pm


Thursday, February 23, 2017

Lovely Day DT Project

It is my day to show off my DT project over at Connie Can Crop. This month's sponsor is: http://www.funstampersjourney.com/


Ruby sent these cute items to work with:
 

I used them to create this card:


I used colored pencils to color the image which I attached to the front of the darling doily. I ran the twine across the middle of the card hiding my join behind the main image. I used foam pads to adhere the image to the card face.

After cutting out the sentiment I layered it onto the white cardstock and attached it to the card. I also added the pearls to the corner. The only thing I didn't use was the cute little clothespin.

The card came pre-cut it measures 5.5" wide x 4.25" high.

Please come and join us over at Connie Can Crop and take part in this month's challenge, "Stamp Your Heart Out". This month's prize is a $15.00 gift certificate to Ruby Martha's online store.


Friday, November 18, 2016

Give Thanks Blog Hop


'Thank you' is the best prayer that anyone could say. I say that one a lot. Thank you expresses extreme gratitude, humility, understanding.
Alice Walker...


Welcome to the Give Thanks Blog Hop! 

You should have arrived from Alicia's Blog or if you are lost start at the beginning Alicia's Blog. As we approach the holiday season, I think it is appropriate we should reflect on things for which we can be thankful. We can be grateful for the little things and we should be grateful for the big things. We should take the time to give thanks for all the persons and moments that make our lives so special. 
 
Sooooo, we would like to say a HUGE THANKS to our sponsor today.
 

Theresa is giving away a $20 Stampin' Up Gift Certificate to one lucky winner AND  take 10% off any order placed through her (not available on website) by November 30th. Email her at scrapsbygracie@gmail.com with your order.

All you have to do to win this fabulous prize is comment on each of the blogs.

 That's it! It really is easy. 


Of course, we would love it if you became a follower too.

Comment buttons can be found at the bottom of the post (on most of the blogs).

 Now on with the hop!


I made two cards, first up this, Thank You" card.


And some Twist and Pop, "Thanksgiving" Cards.


Up next is Kim - http://katydidcards.com/
Here is the entire line up in case you get lost:

Alicia - http://goldengoddessdesigns.blogspot.com/
Sue - http://suek86401.blogspot.com/
Kim - http://katydidcards.com/
Lisa - http://lisaslittlerascals.blogspot.com/...
Amanda - http://salnclts76.blogspot.com
Connie - http://conniecancrop.blogspot.com/
Jearise - http://lorbysworld.blogspot.com/
CADC - http://cardadaychallenge.blogspot.com/
Theresa - http://scrapsbygracie.blogspot.com/


Thank you so much for stopping by!
Recipes:

"Thank you" card":

The center area was colored with a Gelato then I added some texture paste on the corners with a stencil. After the paste was dry I used a mini distress ink pad to add some color. Then I added some Imaginisce jewels and a piece of twine.

"Twist and Pop" Card:

I got the directions from: You Tube.

Turkey images from: Ewe - N - Me Printables.
I added some jewels to the sentiment panel to hide the glue dots under the vellum.
I added some twine to help hold them closed while they are traveling through the snail mail system.
The cards are a whole lot easier to make than they look, please give them a try.

I am entering these cards into this challenge:
Robyn's Fetish - 342 - Anything for Thanksgiving

Monday, October 3, 2016

Falling Leaves

It's that time of year again, the leaves are changing colors and falling off the trees. Here in Arizona they don't do much changing of colors, green to yellow then they fall. It takes until sometime in December for all of them to fall, I do miss the changing colors we had in Michigan.


I created the background by stamping the page with various colors and leaves, the stamps are all from Unity Stamp's, "Grateful Hearts" kit which I have had for about a year and a half to two years.
 
I used a really old Cuttlebug die to die cut the maple leaves on the sentiment panel, the 2 small leaves on top of the sentiment panel are brads that I removed the prongs from and attached with hot glue. I added a piece of twine on the fold.


I am entering this card into these challenges:

Jo's Scrap Shack - #158 - Cut it up With Twist
Dies R Us # 58 - Leaves on the Trees
DL Art - October Linky Challenge
Just Us Girls - 363 - Word Week - Leaves
Retro Rubber Challenge - Tie Me Up

Friday, October 9, 2015

Ewe-N-Me Printables Halloween Cards

Hang tags are so versatile and jars are really popular right now for crafting so when I saw these hang tags with jars on them I couldn't resist the temptation to play with them.


These are perfect for Halloween cards.
 
 
 After printing my files I cut them out and went to work.  I put some twine around the lids and added some googley eyes to the pumpkin, the die cut pumpkin and spider are extra cuts from previous projects. A couple of crow buttons that I painted with black chalk paint and added some eyes to.
 
 
More leftover cuts from previous projects plus a couple of black jewels.


I added some star buttons on this one that I painted with black chalk paint then added some craft twinkles to.

All of the sentiments and buttons are from Plum Purdy.com

I cut the banners from papers I had leftover from cutting out the cards.


Saturday, May 9, 2015

HIMCR #198 - Super Scraps Saturday

HIMCR #198 - Super Scraps Saturday

The sponsor is 2 Cute Ink!

The giveaway is 2 images, winner's choice, from 2 Cute Ink!

I got to work with this cute unicorn.

 
I started with a 5 x 7 card base, to make the background I used a piece of watercolor paper which I dry embossed then I added some color with my gelatos. The thing I have found out about gelatos is, less is better unless you want a very dark, heavy color. After coloring with the gelatos I rubbed the color in with my finger and a wet paint brush.
 
I colored my image with chalks and cut out with a Spellbinder's circle die, I also backed the image with a piece of chipboard cut with the same die. I put an Action Wobble on the back before attaching to the card.
 
The sun, cloud and sentiment are all from the Spellbinder's Celebrations set thanks to Alicia at Golden Goddess Designs and a Spellbinder's facebook giveaway, she tagged me, I tagged her and her name was drawn along with mine.
 
I added a few sequins and a piece of twine.


Friday, April 3, 2015

Gift box with matching card

I love chickens so when I saw this printable I just had to have it, one of these days I would like to have a few chickens of my own. Link to printable
 
 
You get 7 images on the sheet, 3 of the larger image and 4 of the smaller one. I used two of the bigger images on the box and 1 of the smaller images on the card.
 
 
I made this cute gift box and matching card. The box is cut using my Cricut and Tags, Bags, Boxes and More 2 cartridge. The papers were printed with my Imagine. I used my Cuttlebug Alphabet Dies to cut the, "Hello Spring".
 
 
After cutting the box out I added the checkerboard paper then wrapped a black and white stripped ribbon then topped that ribbon with red ribbon. I added red and black twine at the top and tied it into a bow. I adhered the images using foam pads.


I used the same papers on the card but added a piece of read to break up the checkerboard paper. Wrapped the same ribbons around the checkerboard and lower part of the red layer, I used foam tape to adhere the layers to the card face with some extra foam tape under the shaker portion. I used clear beads and red sequins to the shaker element. And added a piece of red twine to the folded edge.


Friday, January 30, 2015

Afternoon Tea Invitation

I had a lot of fun playing with this file from Ewe-N-Me Printables, I am a lifetime tea drinker and while living in Michigan one of my favorite things to do was to meet a friend for afternoon tea in some of Michigan's quaint tea rooms.
 
My first idea was to print up the envelopes, assemble them and try to arrange them in my doll's sandbox where a tea party goes on all the time. I also collect dolls, tea ware (mostly English bone china but I also have a few pieces from Japan).  But I really miss having afternoon tea so I made an invitation to afternoon tea at my home.
 
 
There are several different designs to choose from, I really like the Victorian/vintage look of this one. Tea Thyme Tea Bag Envelopes . You get two tea bag envelopes on each sheet, you just cut them out, fold on the lines and assemble.
 
 
After assembling my envelopes I made a mask with the dots in it and sprayed the cream colored paper with my eBrush then I trimmed it to the size I wanted, 4 1/4" wide (when folded) x 6" tall. I added a piece of washi tape from my son and his wife in Tokyo.
 
The bling swirl is from Zva Creative, I printed the sentiment onto a piece of vellum using my printer, I layered the vellum on to a piece of blue and adhered it to the card with foam pads. I also used foam pads to adhere the tea bag envelope and I tied a piece of twine along the folded edge.
 
 
Please excuse the rock, it was windy and I couldn't get it to stay open so I could get pictures. Here is the other side of the envelope, I used it on the inside to hold the menu.
 
 
If I was really having a tea party I would enclose a copy of the menu so if anyone being invited has an allergy to anything I'm preparing they can let me know so I also included one here. The inner piece is vellum, I attached it to the card with the twine, the menu is also printed on vellum. I would also send along a sample of one of the teas that are being served, putting it in the envelope on the front.
 
Thanks for stopping by.


Friday, January 23, 2015

Love is in the Air

When I first choose this Printable I really didn't know what I was going to do with it but I think that it's super cute so I wanted to work with it. Love is in the Air Cocoa Envelope


A few days after getting the file I received a package from my kids in Tokyo which contained several packages of Japanese crafting/origami papers, stickers and chocolates filled with cognac and apple brandy. This beautiful print was perfect for the Printable and a Valentine card was made.
 
 
I love the Eiffel Tower stamps on this print as well as the vintage postcard look. I did downsize the cocoa envelope a little to fit on the card. The swirl bling is from Zva Creative and the hearts are from Queen and Co., I added a piece of twine to the fold and the card was done. The Love is in the Air cocoa envelope can also hold a gift card, book of love coupons, etc.
  

Saturday, January 10, 2015

HIMCR #180 - Super Scraps Saturday


HIMCR #182 - Super Scraps Saturday!
 
Just use Scraps!

The sponsor is Sweet 'n Sassy Stamps


The giveaway is 3 digitals images from Sweet 'n Sassy Stamps


Recipe:
 
Image from Sweet 'n Sassy Stamps
Cardstock
Colored pencils
Bling is from Zva Creative
Action Wobble
Twine
 
My son and his beautiful wife sent me the printed paper, the sent me several different packages of Japanese crafting/origami papers. I used colored pencils to color the image.
No sentiment as yet because I don't know what I'm going to use it for yet. If the kids do come down with the chicken pox I'll probably send it to them.


Friday, January 9, 2015

12 Months of Note Cards

I couldn't decide if I wanted to make birthday or note cards, then I looked at my stack of correspondence that I SHOULD be answering I went with note cards using this very file: Altered Calendar Hang Tags  You get all 12 months in this file.


Since I am still learning how to use the eBrush I got with my Christmas gift card I wanted to incorporate it in the project so I pulled out the masks that I have had for a couple of years but never used before. I really like the rick rack/zig zag look so I started with that mask. I also decided to go with a newsprint paper because the rick rack on these are layered on to newsprint paper.


I laid the mask on my paper and held it into place using blue painter's tape (this stuff is GREAT!! I've had this roll for quite a while but never used it before). I find that the eBrush is very easy to use, changing colors is no big deal and I don't have the overspray that you get when you use the spray bottles, no more going outside in the wind trying to add a little color to my paper.


I really like the way I had a couple of different zig zag options to add a little extra to my note cards but I got tired of zig zags and used different masks on the remainder of the year.


I like the zig zag pattern the best then the diamond shaped mask, not real nuts about the circles, which do you prefer?
 
As you can see, I punched the hole at the top of the tag and added a matching piece of twine and a piece of twine up the folded side. On the zig zag patterned paper I also added a piece of matching paper that I ran through my Cuttlebug with a zig zig edge folder. I adhered the tags to the card using foam tape.