

Welcome to the
Holiday Magic Blog Hop
Thank you for joining us for a weekend full of the magic of the Christmas Holidays! Our talented crafters have created all sorts of projects to inspire you and bring the joy of the season into your hearts!
You should have arrived from the very creative Christi's blog https://tranquility1905.blogspot.com/.... If you just happened upon this magical hop, Connie Can Crop is the first stop in this hop.
This is a one day blog hop and we appreciate your leaving a comment for all of these amazing crafters.
We have an awesome sponsor for this month!

One lucky winner will win a $21.00 gift certificate to shop their awesome products.
Be sure to visit them online here.
On facebook here.
And their blog here.
What do you need to do to win? Easy... become a follower of each of the fabulous blogs in this hop and leave each of them a comment letting them know what you like best about their projects.
You will have until 10 pm Sunday to finish the hop and leave your comments.
Winner will be announced on Wednesday 12/14/16
at Connie Can Crop.
Be sure to follow everyone and leave a comment along the way!
I have two Christmas cards to share with you today. They are both very easy to make.

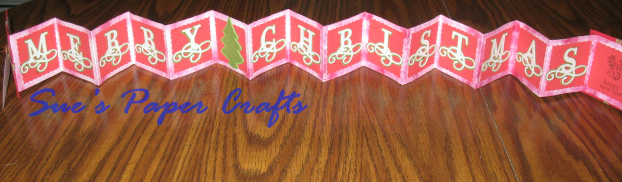


Mini Christmas Card in a Box
Strips of card with a width of just under 2.5 inches
Craft knife, ruler and cutting mat
Gelatos
Chipboard (I used an empty cereal box)
Scraps of craft paper and ribbon
Mini tag
Mini tag
Distress Ink
1.Cut out letters, I used Cricut’s Tie the Knot cartridge and the Monogram feature @ 1 ½” and the Monogram shadow. Assemble letters.
2. Cut 17 - 2” squares, I used scalloped squares.
3. Cut out several strips of card with a width of 2 1/2 inches. Score the card with a craft knife at intervals of just under 2 1/2 inches and then fold it to form a concertina. Color the plain side of the concertina folded paper, I used Gelatos.
4. After Gelatos have dried, glue the letters in place, leaving a space after, “Merry” and another space after, “Christmas”. Decorate the blank spaces any way you want.
5. When the strips are all ready to be glued together, make sure to overlap the strips at the back.
6. To create the cover, I cut out two thick pieces of card slightly larger (about an 1/8” larger all the way around than the pages inside.
7. Cut two squares of paper at least half an inch larger than the two squares cut in the step above. Use the larger squares to cover the two squares folding the edges and trimming with a craft knife.
8. Use scraps of gold ribbon to wrap around the cover and glue them at the back.
9. Write a greeting on a small tag. Use Distress Ink to go around the edges of the tag. Attach the tag to the cover using a small piece of gold thread, tying it in a bow.
10. Glue the inside pages to the covers using craft glue and allow to dry under a weight, such as a pile of books.
11. Make a box for the book to fit inside and you’re done.
I got the original idea here, you can see how to make the card and box. I made several changes to make the project fit my supplies.
And now for the Star Book Card:


I got the original idea here, you can see how to make the card and box. I made several changes to make the project fit my supplies.
And now for the Star Book Card:


Again, I didn't come up with this idea all by myself and I do like to give credit where credit is due so.............
Up next is The Very Talented Holli: http://sunflowerholli.blogspot.com/
Here's our line up in case you get lost:
Connie- http://conniecancrop.blogspot.com/
Shannon H- http://shannonhdesigns.blogspot.com/...
Angela- mermaidsnmonograms.blogspot.com
Christi- https://tranquility1905.blogspot.com/...
Sue- http://suek86401.blogspot.com/
Holli- sunflowerholli.blogspot.com
Ashley- http://marinewifesscrappinlife.blogspot.com/...
Diana- http://daisylovecreations.blogspot.com/...
Kim- http://katydidcards.com/
Veronica- http://vickyscrappingpassion.blogspot.com/...
Amanda- salnclts76.blogspot.com
Miranda- http://www.nanasscrapspot.com/
Sandy- http://simplycraftycreationsbysandys.blogspot.com/...
Lisa- http://lisaslittlerascals.blogspot.com/...
Alicia- http://goldengoddessdesigns.blogspot.com/
Sharon- http://piece-ofheart.blogspot.com/
Jearise- http://lorbysworld.blogspot.com/
Sarah- http://sarahbiswabic.blogspot.com/
Wishing you all a very Merry Christmas!!!
Shannon H- http://shannonhdesigns.blogspot.com/...
Angela- mermaidsnmonograms.blogspot.com
Christi- https://tranquility1905.blogspot.com/...
Sue- http://suek86401.blogspot.com/
Holli- sunflowerholli.blogspot.com
Ashley- http://marinewifesscrappinlife.blogspot.com/...
Diana- http://daisylovecreations.blogspot.com/...
Kim- http://katydidcards.com/
Veronica- http://vickyscrappingpassion.blogspot.com/...
Amanda- salnclts76.blogspot.com
Miranda- http://www.nanasscrapspot.com/
Sandy- http://simplycraftycreationsbysandys.blogspot.com/...
Lisa- http://lisaslittlerascals.blogspot.com/...
Alicia- http://goldengoddessdesigns.blogspot.com/
Sharon- http://piece-ofheart.blogspot.com/
Jearise- http://lorbysworld.blogspot.com/
Sarah- http://sarahbiswabic.blogspot.com/
Wishing you all a very Merry Christmas!!!
And don't forget to check out the this month's challenge!!


Connie Can Crop Challenge #53
due 11:59 P.M. Saturday, December 31st
Pacific Time


