Showing posts with label Halloween. Show all posts

Friday, October 27, 2017

DT Post with Dreaming Tree SVG'S

Today is my day to share with you what I have made with files from this month's sponsor, Dreaming Tree.


I choose the Holiday Hauntings bundle to work with, I did the Cats Meow Lantern for my challenge post, the Halloween Cupcake Box for my blog hop post and today I'm sharing the Shudder Shutter Card and Spooky Lantern.


Dreaming Tree has some really wonderful SVG'S, including lots of great freebies. Each file comes with a PDF showing what to cut out of what color and a video assembly tutorial. Please head on over there and check out all of the wonderful items Dreaming Tree.
 
And don't forget this month's To Die For Challenge at Connie Can Crop.


Friday, October 13, 2017

Chills and Thrills Blog Hop

Welcome to the
Chills & Thrills
...
Blog Hop

It's that time of the year when the monsters and ghouls come out to play!
They come knocking on doors in search of sweets!!
Join us as we share some of our fangtastic and creepy projects with you!
They are sure to make you scream with delight.
You should have arrived from
If not, Connie Can Crop is the beginning of this chilling blog hop.
This is a one day blog hop, but you have until Sunday to finish hopping and leaving your love for all of these talented crafters.

 We have an awesome sponsor for this month!
TWO lucky winners will win a $7.99 gift certificate
Be sure to check out the shop online HERE
Visit them on facebook HERE
What do you need to do to win? Easy... become a follower of each of the fabulous blogs in this hop and leave each of them a comment letting them know what you like best about their projects.
You will have until 10 pm Sunday to finish the hop and leave your comments.
Winners will be announced on Wednesday 10/18/17 at Connie Can Crop.
Be sure to follow everyone and leave a comment along the way!
TRICK OR TREAT!!

I choose the Halloween Hauntings SVG Bundle to work with, I used it for all of my projects this month.
For today's project I made the Halloween Cupcake Box.


I didn't have a cupcake to put in the box so I put in a battery operated tea light.
Now hop on over to Kim's Blog
Here's our spooktacular line up in case you get lost:
Don't forget to join our current challenge
Connie Can Crop Challenge #63
To Die For
due 11:59 P.M. Tuesday, October 31st, 2017
Pacific Time

Sunday, September 25, 2016

Happy Halloween

I actually managed to make a few Halloween cards but will I manage to mail them all out in time? :):)

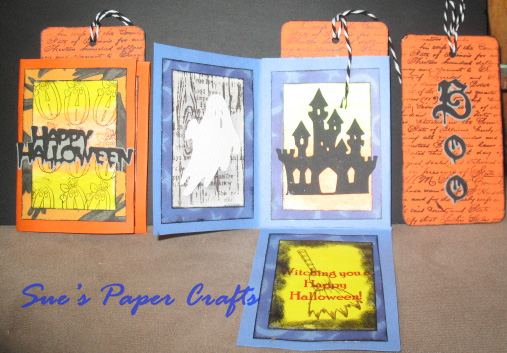
This is a Small Folding Pocket Card, the directions are at the bottom. They have a cute little bookmark that goes into the pocket.


 Here are all 4 of them, all folded up and ready to mail.


Outside of orange card, inside of one of the blue cards and bookmark.

 
Inside of card with bottom flap folded up.

Directions, please pay attention to the spot that states, "sample only - squares are NOT to size!"
 
Recipe:
 
Pumpkin, broom, sentiment and cat stamps are all from Plum Purdy, she no longer sells stamps and I was very lucky go get the ones I have.
Background stamps - on ghost page is a Unity stamp and the one on the bookmark is from Prima Marketing.
Die Cuts - Cricut Happy Hauntings cartridge.
Backgrounds all colored with Gelatos.  

Tuesday, June 7, 2016

Halloween in June

My gal pal Renee from Plum Purdy found this cute little Vintage Postcard Kit in her crafty stash and sent it to me. It comes with 6 postcards and 8 Halloween stamps, 12 embellishments and 18 chipboard pieces.

 
There are several things you can make with these, I decided to make a Halloween banner.


I used all of the stamps and all of the included embellishments as well as some bling from my stash but I didn't use any of the chipboard pieces, I added them to my stash to use another time.


Friday, October 9, 2015

Ewe-N-Me Printables Halloween Cards

Hang tags are so versatile and jars are really popular right now for crafting so when I saw these hang tags with jars on them I couldn't resist the temptation to play with them.


These are perfect for Halloween cards.
 
 
 After printing my files I cut them out and went to work.  I put some twine around the lids and added some googley eyes to the pumpkin, the die cut pumpkin and spider are extra cuts from previous projects. A couple of crow buttons that I painted with black chalk paint and added some eyes to.
 
 
More leftover cuts from previous projects plus a couple of black jewels.


I added some star buttons on this one that I painted with black chalk paint then added some craft twinkles to.

All of the sentiments and buttons are from Plum Purdy.com

I cut the banners from papers I had leftover from cutting out the cards.


Saturday, June 27, 2015

HIMCR #205 - Any Holiday

HIMCR #205 - Any Holiday!


The sponsor is Hiding in My Craft Room!


hidinginmycraftroom.com

The giveaway is a Cricut Robot Party Cartridge!


I made another Halloween card because I wanted to use these stamps from www.plumpurdy.com and all of the papers were in my scrap pile. I am doing my best to use up all that I can from that scrap pile before cutting up more papers/cardstock.
 
I started with the background, stamping the pumpkin image on with StazOn black ink. Then I added the card base, stamped the sentiment and layered it onto a scrap of black glitter cardstock and foam pads. I finished off with a piece of black/white twine.


Sunday, October 26, 2014

Halloween Mini Book Made With A Snack Bag Wrapper

Good morning everyone. Today's project is a bit different, I used a Halloween Snack Bag Wrapper to create a mini Halloween book. I pulled out some old Halloween pics of my son to create this.


First I printed the Printable from Ewe-N-Me Printables and cut it out, then I picked out some scraps from my stash to create the pages and trimmed them to fit inside. I cut 6 pages, making them a little smaller than the area inside the wrapper.

 
Then I punched the holes for the binding wire using my Cinch Book Binder. It's important to do this step before adding your pictures/embellishments so that you don't inadvertently place something in the way of where you want the holed punched.
 
 
I decorated my pages and did the binding with my Cinch.


Adhere the back page of the mini book to the inside back of the Snack Bag Wrapper.
 
 
Use a decorative paper clip to hold book closed.


This was fast and easy to make and is a perfect little book to send my son, his wife loves pictures of David when he was young.