Showing posts with label Christmas. Show all posts

Friday, October 4, 2019

Christmas in October

I got an early start on Christmas cards this year. I used both of my foiling toys to create them.

My Foil Press and Spellbinder's Reindeer Games Glimmer Plate. I added a bit of bling for some extra shine.

My Foil Quill and Cricut helped me to create the insides. I used red foil on the red cards and.....
Green foil for the green cards.

The reindeer is from Cricut's Christmas cartridge and the font is from my computer system.

I am entering this into this challenge:

A2Z's Final Challenge - store closing

Friday, December 7, 2018

The Stockings Were Hung Blog Hop


Thank you for joining us for the 
Stockings were Hung Blog Hop!


The stockings were hung by the chimney with care,
In hopes that St. Nicholas soon would be there!
This is a blog hop featuring projects inspired by Christmas Stockings! Each of our projects will have at least one stocking on it.


You should have arrived from Jearise's blog but if you just so happened to stumble across our hop and need to start at the very start,
Connie Can Crop is the beginning of this Special holiday hop! 
This is a one day blog hop, but you have until Sunday at 10pm to finish hopping and leaving your love for all of these talented crafters.


We have three awesome sponsors for this hop!!


is giving away Kaisercraft Peace and Joy paper pad and collectibles


and

Wendy Chapman Bellino


What do you need to do to win? Easy... become  a follower of each of the fabulous blogs in this hop and leave each of them a comment letting them know what you like best about their projects.

You will have until 10 pm Sunday to finish the hop and leave your comments on every blog to be eligible to win. 
Winners will be announced on Wednesday 12/12/18 at Connie Can Crop.
Be sure to follow everyone and leave a comment along the way!


Here's what I created for the hop.


This is my granddaughter's gift card, card. The papers are from my stash, I even managed to dig up a few Christmas scraps to use up. The stocking is from Cricut's Christmas Cheer cartridge. I wrote, "Rachael" directly on the paper before cutting with a Cricut pen. I can't remember which font I used.

I added a gift card envelope to the inside. I used my We R Memory Keepers Envelope Punch Board to make it. The, "Merry Christmas" is from my Spellbinder's November Small Kit of the Month set.


Be sure to hop over to Nicole's Blog

Here's our line up in case you get lost along the way.


Wishing you a Merry Christmas!
Be sure to join us next month for our
This Magic Moment Disney Themed Blog hop!

Thank you for letting us inspire you!

Tuesday, December 4, 2018

Big Rig Christmas

I have been absent for a while, life sure has kept me busy these past few months. If I ever get my 500 cross country Amtrak pictures all edited I'm going to have a huge scrapbook to make.

However for now I'm working on Christmas stuff. I made this for my great-nephew, AJ who lives in Michigan. My dad and older brother were both over the road truckers. Sadly we lost both of them before AJ came along. 


The file is from Simply Crafty SVGs and was very easy to assemble. If you ever get stuck on one of their projects Sandy's assembly videos are GREAT!!!


I used my envelope punch board to add a gift card holder and die cut a, "Merry Christmas" for the inside. 

I added some jewels to the wreaths on both sides and wrote a sentiment on the other side of the inside.


Friday, December 15, 2017

Penguin/Cactus Christmas Card


I had a bit of free time yesterday and I wanted to make something totally different for Christmas. So I used my Cricut to cut a cactus with the Southwest cartridge and went to work. I had planned on embossing the red layer but you know how that goes, it was already on the card before I remembered. With this weather (low 60's and sunny) it is kind of hard to think of Christmas being right around the corner.


These penguins have been in my stash for a long time, they are charms. I took the rings off of the tops and used brads to attach them to the cactus.


I am entering this card into this challenge:

Fantabulous Cricut - 316 - Christmas

Sunday, November 19, 2017

Crafting Cutting Crew October Challenge - Simply Crafty SVG Prize

October's challenge over at The Crafty Cutting Crew's Facebook Page was sponsored by Simply Crafty SVG'S. The prize was a Simply Crafty SVG gift card. The challenge was to use one of Simply Crafty SVG'S files to create a Christmas project.

I decided on one of the free files to work with, a swing card.


My cards:

 
I won the challenge and had fun spending my gift card. One of the files I picked was this Christmas Double Fold set.


I used up some brads that I have had around forever on the closing bands.
 
I wanted to add a splash of color to the ornament card so I put a few jewels here and there. I got the sentiment stamp from Hobby Lobby it was in the clearance pile.


Another Hobby Lobby clearance stamp.

 
I have a few odds and ends jewels to use up because I just ordered a whole bunch more so I used some of the Christmas leftovers on the inside Christmas tree. The sentiment stamp was one of the ones in the grab bag I had ordered from Unity Stamps last week. I just love the font.
 
I managed to use a few scraps but I am afraid that as usual I made more scraps than I used.
 
There are still a few more files I need to play with from this great prize but real life is getting in my way and I need to get a few things done including my Christmas cards and some door drafts to whip up on the Serger if I can remember how to use it.
 
I am entering these cards into this challenges:


Sunday, October 8, 2017

The Crafty Cutting Crew

Today I'm playing along with a challenge on facebook The Crafty Cutting Crew. The sponsor is Simply Crafty SVG'S you need to use a Simply Crafty SVG in a Christmas project. This swing card file is one of many freebies that they have.


The printed papers are from Craft Smith.


Sunday, December 11, 2016

4 Fold Card

I came across a new to me fold at: you tube. Here is a link to her blog which gives the sizes to cut the papers but not where to score them, that information is in the video: Dawn's Stamping Thoughts.


All of the patterned papers are from Craft Smith. The tree was cut with my Cricut and the Ribbons and Rosettes cartridge, the ribbon and jewels are from my stash.
 
The stamps:

"Christmas Cookies" - from Plum Purdy, I have had it about 3 years.
 
 
"Merry & Bright" - 12 Days of Christmas from My Mind's Eye, I have had it for 5 years.
 
All of the rest are from an old set I got as a freebie from a British craft magazine I used to subscribe to and I have had them for at least 5 years.
 
I am entering this card into this challenge:


Retro Rubber Challenge #53
And this one:

Not Just Cards December Challenge

Friday, December 9, 2016

Holiday Magic Blog Hop


Welcome to the 
Holiday Magic Blog Hop
Thank you for joining us for a weekend full of the magic of the Christmas Holidays! Our talented crafters have created all sorts of projects to inspire you and bring the joy of the season into your hearts!

You should have arrived from  the very creative Christi's blog https://tranquility1905.blogspot.com/.... If you just happened upon this magical hop, Connie Can Crop is the first stop in this hop. 
This is a one day blog hop and we appreciate your leaving a comment for all of these amazing crafters.


We have an awesome sponsor for this month! 


One lucky winner will win a $21.00 gift certificate to shop their awesome products.
Be sure to visit them online here.
On facebook here.
And their blog here.


What do you need to do to win? Easy... become  a follower of each of the fabulous blogs in this hop and leave each of them a comment letting them know what you like best about their projects.

You will have until 10 pm Sunday to finish the hop and leave your comments.
Winner will be announced on Wednesday 12/14/16
Be sure to follow everyone and leave a comment along the way!

I have two Christmas cards to share with you today. They are both very easy to make.


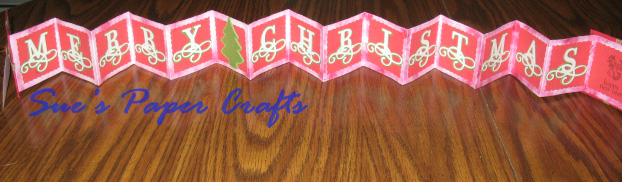
Mini Christmas Card in a Box 
 
Strips of card with a width of just under 2.5 inches
Craft knife, ruler and cutting mat
Gelatos
Chipboard (I used an empty cereal box)
Scraps of craft paper and ribbon
Mini tag
Distress Ink
 
1.Cut out letters, I used Cricut’s Tie the Knot cartridge and the Monogram feature @ 1 ½” and the Monogram shadow. Assemble letters.
2. Cut 17 - 2” squares, I used scalloped squares.
 
3. Cut out several strips of card with a width of 2 1/2 inches. Score the card with a craft knife at intervals of just under 2 1/2 inches and then fold it to form a concertina. Color the plain side of the concertina folded paper, I used Gelatos.
 
4. After Gelatos have dried, glue the letters in place, leaving a space after, “Merry” and another space after, “Christmas”. Decorate the blank spaces any way you want.
 
5. When the strips are all ready to be glued together, make sure to overlap the strips at the back.
 
6. To create the cover, I cut out two thick pieces of card slightly larger (about an 1/8” larger all the way around than the pages inside.
 
7. Cut two squares of paper at least half an inch larger than the two squares cut in the step above. Use the larger squares to cover the two squares folding the edges and trimming with a craft knife.

8. Use scraps of gold ribbon to wrap around the cover and glue them at the back.

9. Write a greeting on a small tag. Use Distress Ink to go around the edges of the tag. Attach the tag to the cover using a small piece of gold thread, tying it in a bow.
 
10. Glue the inside pages to the covers using craft glue and allow to dry under a weight, such as a pile of books.
 
11. Make a box for the book to fit inside and you’re done.

I got the original idea here, you can see how to make the card and box. I made several changes to make the project fit my supplies.

 And now for the Star Book Card:


Again, I didn't come up with this idea all by myself and I do like to give credit where credit is due so.............


 Up next is The Very Talented Holli: http://sunflowerholli.blogspot.com/

Here's our line up in case you get lost:

Connie- http://conniecancrop.blogspot.com/
Shannon H- http://shannonhdesigns.blogspot.com/...
Angela- mermaidsnmonograms.blogspot.com
Christi- https://tranquility1905.blogspot.com/...
Sue- http://suek86401.blogspot.com/
Holli- sunflowerholli.blogspot.com
Ashley-  http://marinewifesscrappinlife.blogspot.com/...
Diana- http://daisylovecreations.blogspot.com/...
Kim- http://katydidcards.com/
Veronica- http://vickyscrappingpassion.blogspot.com/...
Amanda- salnclts76.blogspot.com
Miranda- http://www.nanasscrapspot.com/
Sandy-  http://simplycraftycreationsbysandys.blogspot.com/...
Lisa- http://lisaslittlerascals.blogspot.com/...
Alicia- http://goldengoddessdesigns.blogspot.com/
Sharon- http://piece-ofheart.blogspot.com/
Jearise- http://lorbysworld.blogspot.com/
Sarah-  http://sarahbiswabic.blogspot.com/

Wishing you all a very Merry Christmas!!!

And don't forget to check out the this month's challenge!!


Connie Can Crop Challenge #53
due 11:59 P.M. Saturday, December 31st
Pacific Time

Tuesday, December 6, 2016

Advent Calendar

It is a little late to create one of these but it's never too early to think about next year, is it? I like to give credit where credit where is due, the original idea came from Jo Ann's Website.


My base is a 4 1/2" square of wood which I painted green.


Instead of using the pre-made boxes in the original directions, I cut 25 boxes with my Cricut using the Wrap it Up cartridge and the cut for the car box @ 7" (you know how cuts are in Cricutland).


All of the papers are from Craft Smith's Homemade Holiday and Timeless Holiday paper pads.
 
After assembling the boxes I cut the numbers with Cricut's Designer Calendar cartridge using the boxed feature and cutting @ 1.6 inches out of dark green vinyl. I also added some sequins to each box.
 
For each level of boxes, the boxes are glued together with a glue gun as you can see in the 2nd picture above. The bottom layer of boxes is also glued to the wood base but all of the other layers are just glued box to box but not the layers. That is so that you can take the upper layers off so that you can access the boxes to open them up.
 
I die cut 3 stars then scored down the middles and glued together so they form a 3D star.
 
Fill with candy or verses, maybe both.
 
The layers are:
 
Bottom 2 - 6 boxes in each layer
3rd row up - 5 boxes
4th row up - 4 boxes
5th row up - 3 boxes
Top row - 1 box


Saturday, November 26, 2016

Sketcn - n - Scrap Sketch #68

It is sketch time again over at Sketch - n- Scrap. Since Christmas is coming I made another Christmas card. I love this sketch, it was a lot of fun to play with.


The card base is Kraft paper, the stripped paper is from Craft Smith, the other papers are all scraps from my ever growing pile of scraps. The flower is from my stash along with the pearls and sentiment.

I am entering this card into this challenge:
http://sketchnscrap.blogspot.com/