
HIMCR #168 - Halloween Colors!
Just use whatever you consider Halloween colors and it doesn't have to be a Halloween project! :)
Just use whatever you consider Halloween colors and it doesn't have to be a Halloween project! :)

The giveaway is a $20 gift certificate to Stamp & Create!
I was feeling rather crafty this week so I cam up with 2 projects.

The, "Trick or Treat" box started with a file from: Graciellie Design. I am a snail mailer so and this is a prefect gift for my pals. It was very easy to do, you get the box, notecards and envelopes all in 1 file.

This is such a beautiful design and perfect for Halloween colors. I printed the box along with 6 each of the notecards and envelopes then I cut them all out, inked my edges and assembled the cards and box.
Add a ribbon and tag, the tag is from Cricut's Tags, Bags, Boxes and More 2, the, "Trick or Treat" is from October 31, I only used the negatives from the cut. I also sprayed the cardstock with some Tattered Angels Tattered Leather spray. Added a flower from my stash and was done.
Then I moved on to the Waterfall Card.
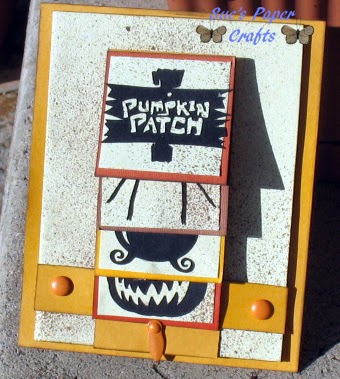
I have done a little tutorial for you, if you don't understand a step, please email me at: suek86401@gmail.com
Waterfall
Card
By
Sue Kracker
Tutorial
Supplies:
Cardstock – neutral, colored for
base and scraps of 4 different colors
Chipboard – an empty cereal box
works perfect
Glimmer mist – Tattered Leather and
Yellow
Scoring board and paper trimmer
Brads, paper punch
Adhesives
Images, sentiment
I don’t have any Halloween stamps so
I cut some images with my Cricut, you can either stamp and color your images or
cut them.
1.
Spray your cardstock, I used
Tattered Leather on the neutral and Yellow on the colored.
2.
After the papers dry it’s time to
cut –
Cut the neutral
Cardstock in the following measurements: 5 ¼” x 8 (1), 1 7/8” x 1 7/8” (4).
Cut the scraps of
colors to measure 2” x 2” and the base color in the following measurements: 5
½” x 4 ¼” (1), 9” x 2” (1), ¾” x 4” (1).

3. Fold
the largest piece of neutral colored stock in half so that it now measures 5 ¼”
x 4”. Cut chipboard a little smaller than cardstock and adhere to both sides so
the chipboard is in between the layers like a sandwich.
4. Ink
all edges. Stamp and color images or add cut images to the 1 7/8” squares of
neutral cardstock, layer them on top of the 2” squares.
5. Score
the 9 x 2 strip starting at one end of the strip; score at: 2”, 2 ¾”, 3 ½” and
4 ¼” so that it looks like this then fold along the scored lines so that it
looks like this:

6. Attach
the ¾” x 4” strip to front of card, I used brads, some people use eyelets. I
filled the tops of my brads with glue before inserting into the holes and let
dry before moving on. You don’t want to glue or tape the strip down, you want
to be able to slip the, “waterfall” into it.
7. Attach
your first image to the bottom 2” x 2” space of the 9” x 2” long strip, attach
the next image to the next scored section, do the same with the last 2 images. BE SURE TO ONLY ATTACH THE TOP PART OF THE
LAST 3 IMAGES TO THE STRIP.
8. Slip
bottom of the 9” x 2” strip under the ¾” x 4” strip, adhere BOTTOM ONLY of the first image to the
front of the ¾” x 4” strip.
9. Gently
pull the strip that lays UNDER the ¾” x 4” piece, your top pieces should
cascade behind as shown in the pictures. Decide where you want your sentiment
and add it to the strip. Add either a brad and tab or an eyelet and piece of
ribbon to bottom so that the recipient can pull the strip down.
10.
Attach the finished top of the card
to the biggest piece of colored cardstock, I used very thin foam pads as the
brads caused a hump.
 |
| As you pull the bottom of the tab out, the images you added should, "cascade" behind the front of the long strip. |

 |
| I added some stickles to the evil pumpkin's eyes for a more sinister look.
Please feel free to contact me at: suek86401@gmail.com if you don't understand a step and I will do my best to explain it to you. It really isn't hard at all, it's actually fairly easy.
|
I just shared it! Awesome Sue, love what you've created! And yes, these recent sets I've released were designed for Fall, so the color palette is spot on! Hugs my friend.
ReplyDeleteRemember that there is a giveaway going on right now, perhaps your friends want to add their name to the inlinkz on my blog!
WOW you have been busy. LOVE them. The colors are perfect.
ReplyDeleteThanks so much for sharing and for the tutorial.
Be well my friend.
Crafty hugs,
D~
DesignsByDragonfly.blogspot
wonderful cards and I love the addition of spritzed inks!
ReplyDelete